Search Results: "mkd"

18 April 2021

Russell Coker: IMA/EVM Certificates

I ve been experimenting with IMA/EVM. Here is the Sourceforge page for the upstream project [1]. The aim of that project is to check hashes and maybe public key signatures on files before performing read/exec type operations on them. It can be used as the next logical step from booting a signed kernel with TPM. I am a long way from getting that sort of thing going, just getting the kernel to boot and load keys is my current challenge and isn t helped due to the lack of documentation on error messages. This blog post started as a way of documenting the error messages so future people who google errors can get a useful result. I am not trying to document everything, just help people get through some of the first problems. I am using Debian for my work, but some of this will apply to other distributions (particularly the kernel error messages). The Debian distribution has the ima-evm-utils but no other support for IMA/EVM. To get this going in Debian you need to compile your own kernel with IMA support and then boot it with kernel command-line options to enable IMA, in recent kernels that includes lsm=integrity as a mandatory requirement to prevent a kernel Oops after mounting the initrd (there is already a patch to fix this). If you want to just use IMA (not get involved in development) then a good option would be to use RHEL (here is their documentation) [2] or SUSE (here is their documentation) [3]. Note that both RHEL and SUSE use older kernels so their documentation WILL lead you astray if you try and use the latest kernel.org kernel. The Debian initrd I created a script named /etc/initramfs-tools/hooks/keys with the following contents to copy the key(s) from /etc/keys to the initrd where the kernel will load it/them. The kernel configuration determines whether x509_evm.der or x509_ima.der (or maybe both) is loaded. I haven t yet worked out which key is needed when.
#!/bin/bash
mkdir -p $ DESTDIR /etc/keys
cp /etc/keys/* $ DESTDIR /etc/keys
Making the Keys
#!/bin/sh
GENKEY=ima.genkey
cat << __EOF__ >$GENKEY
[ req ]
default_bits = 1024
distinguished_name = req_distinguished_name
prompt = no
string_mask = utf8only
x509_extensions = v3_usr
[ req_distinguished_name ]
O =  hostname 
CN =  whoami  signing key
emailAddress =  whoami @ hostname 
[ v3_usr ]
basicConstraints=critical,CA:FALSE
#basicConstraints=CA:FALSE
keyUsage=digitalSignature
#keyUsage = nonRepudiation, digitalSignature, keyEncipherment
subjectKeyIdentifier=hash
authorityKeyIdentifier=keyid
#authorityKeyIdentifier=keyid,issuer
__EOF__
openssl req -new -nodes -utf8 -sha1 -days 365 -batch -config $GENKEY \
                -out csr_ima.pem -keyout privkey_ima.pem
openssl x509 -req -in csr_ima.pem -days 365 -extfile $GENKEY -extensions v3_usr \
                -CA ~/kern/linux-5.11.14/certs/signing_key.pem -CAkey ~/kern/linux-5.11.14/certs/signing_key.pem -CAcreateserial \
                -outform DER -out x509_evm.der
To get the below result I used the above script to generate a key, it is the /usr/share/doc/ima-evm-utils/examples/ima-genkey.sh script from the ima-evm-utils package but changed to use the key generated from kernel compilation to sign it. You can copy the files in the certs directory from one kernel build tree to another to have the same certificate and use the same initrd configuration. After generating the key I copied x509_evm.der to /etc/keys on the target host and built the initrd before rebooting.
[    1.050321] integrity: Loading X.509 certificate: /etc/keys/x509_evm.der
[    1.092560] integrity: Loaded X.509 cert 'xev: etbe signing key: 99d4fa9051e2c178017180df5fcc6e5dbd8bb606'
Errors Here are some of the kernel error messages I received along with my best interpretation of what they mean. [ 1.062031] integrity: Loading X.509 certificate: /etc/keys/x509_ima.der
[ 1.063689] integrity: Problem loading X.509 certificate -74 Error -74 means -EBADMSG, which means there s something wrong with the certificate file. I have got that from /etc/keys/x509_ima.der not being in der format and I have got it from a der file that contained a key pair that wasn t signed.
[    1.049170] integrity: Loading X.509 certificate: /etc/keys/x509_ima.der
[    1.093092] integrity: Problem loading X.509 certificate -126
Error -126 means -ENOKEY, so the key wasn t in the file or the key wasn t signed by the kernel signing key.
[    1.074759] integrity: Unable to open file: /etc/keys/x509_evm.der (-2)
Error -2 means -ENOENT, so the file wasn t found on the initrd. Note that it does NOT look at the root filesystem. References

7 April 2021

Emmanuel Kasper: Manually install a single node Kubernetes cluster on Debian

Debian has work-in-progress packages for Kubernetes, which work well enough enough for a testing and learning environement. Bootstraping a cluster with the kubeadm deployer with these packages is not that hard, and is similar to the upstream kubeadm documentation

Install necessary packages in a VMInstall a throwaway VM with Vagrant.
apt install vagrant vagrant-libvirt
vagrant init debian/testing64
Bump the RAM and CPU of the VM, Kubernetes needs at least 2 gigs and 2 cores.
awk  -i inplace '1;/^Vagrant.configure\("2"\) do \ config/  print "  config.vm.provider :libvirt do  vm   vm.memory=2048 end" ' Vagrantfile
awk -i inplace '1;/^Vagrant.configure\("2"\) do \ config/ print " config.vm.provider :libvirt do vm vm.cpus=2 end" ' Vagrantfile
Start the VM, login, update the package index.
vagrant up
vagrant ssh
sudo apt update
Install a container engine, here we use docker.io, we could also use containerd (both are packaged in Debian) or cri-o.
sudo apt install --yes --no-install-recommends docker.io curl
Install kubernetes binaries. This will install kubelet, the system service which will manage the containers, and kubectl the user/admin tool to manage the cluster.
sudo apt install --yes kubernetes- node,client  containernetworking-plugins
Although it is not technically mandatory, we will use kubeadm, the most popular installer to create a Kubernetes cluster. Kubeadm is not packaged in Debian, we have to download an upstream binary.
wget https://dl.k8s.io/v1.20.5/kubernetes-server-linux-amd64.tar.gz

sha512sum kubernetes-server-linux-amd64.tar.gz
28529733bf34f5d5b72eabe30a81df98cc7f8e529590f807745cd67986a2c5c3eb86cebc7ecbcfc3df3c50416306e5d150948f2483933ea46c2aebaeb871ea8f kubernetes-server-linux-arm64.tar.gz

sudo tar --directory=/usr/local/sbin --strip-components 3 -xaf kubernetes-server-linux-amd64.tar.gz kubernetes/server/bin/kubeadm
sudo chmod +x /usr/local/sbin/kubeadm
sudo kubeadm version
kubeadm version: &version.Info Major:"1", Minor:"20", GitVersion:"v1.20.5", GitCommit:"6b1d87acf3c8253c123756b9e61dac642678305f", GitTreeState:"clean", BuildDate:"2021-03-18T01:08:27Z", GoVersion:"go1.15.8", Compiler:"gc", Platform:"linux/amd64"
Add a kubelet systemd unit:
RELEASE_VERSION="v0.4.0"
curl -sSL "https://raw.githubusercontent.com/kubernetes/release/$ RELEASE_VERSION /cmd/kubepkg/templates/latest/deb/kubelet/lib/systemd/system/kubelet.service" sudo tee /etc/systemd/system/kubelet.service
sudo systemctl enable kubelet
and a default config file for kubeadm
RELEASE_VERSION="v0.4.0"
sudo mkdir -p /etc/systemd/system/kubelet.service.d
curl -sSL "https://raw.githubusercontent.com/kubernetes/release/$ RELEASE_VERSION /cmd/kubepkg/templates/latest/deb/kubeadm/10-kubeadm.conf" sudo tee /etc/systemd/system/kubelet.service.d/10-kubeadm.conf
finally we need to help kubelet find the components needed for container networking
echo 'KUBELET_EXTRA_ARGS="--cni-bin-dir=/usr/lib/cni"'   sudo tee /etc/default/kubelet

Create a clusterInitialize a cluster with kubeadm: this will download container images for the Kubernetes control plane (= the brain of the cluster), and start the containers via the kubelet service. Yes a good part of Kubernetes itself run in containers.
sudo kubeadm init --pod-network-cidr=10.244.0.0/16
...
...
Your Kubernetes control-plane has initialized successfully!

To start using your cluster, you need to run the following as a regular user:

mkdir -p $HOME/.kube
sudo cp -i /etc/kubernetes/admin.conf $HOME/.kube/config
sudo chown $(id -u):$(id -g) $HOME/.kube/config
Follow the instructions from the kubeadm output, and verify you have a single node cluster, with the status NotReady.
kubectl get nodes 
NAME STATUS ROLES AGE VERSION
testing NotReady control-plane,master 9m9s v1.20.5
At that point you should also have a bunch of containers running on the node:
sudo docker ps --format ' .Names '
k8s_kube-apiserver_kube-apiserver-testing_kube-system_2711c230d39ccda1e74d1d6386a05cee_0
k8s_POD_kube-apiserver-testing_kube-system_2711c230d39ccda1e74d1d6386a05cee_0
k8s_etcd_etcd-testing_kube-system_4749b1bca3b1a73fd09c8e299d7030fe_0
k8s_POD_etcd-testing_kube-system_4749b1bca3b1a73fd09c8e299d7030fe_0
...
The kubelet service also needs an external network plugin to get the cluster in Ready state.
sudo systemctl status kubelet
...
Mar 28 09:28:43 testing kubelet[9405]: E0328 09:28:43.958059 9405 kubelet.go:2188] Container runtime network not ready: NetworkReady=false reason:NetworkPluginNotReady message:docker: network plugin is not ready: cni config uninitialized
Let s add that network plugin. Download the flannel network plugin definition, and schedule flannel to run on all nodes of your cluster:
wget https://raw.githubusercontent.com/coreos/flannel/master/Documentation/kube-flannel.yml
kubectl apply --filename=kube-flannel.yml
After a dozen of seconds your node should be in ready status.
kubectl get nodes 
NAME STATUS ROLES AGE VERSION
testing Ready control-plane,master 16m v1.20.5

Deploy a test applicationOur node is now in Ready status, but we cannot run application on it, since we only have a master node, an administrative node which by default cannot run user applications.
kubectl describe node testing   grep ^Taints
Taints: node-role.kubernetes.io/master:NoSchedule
Let s allow node testing to run user applications:
kubectl taint node testing node-role.kubernetes.io/master-
Deploy a nginx container:
kubectl run my-nginx-pod --image=docker.io/library/nginx --port=80 --labels="app=http-content" 
Create a Kubernetes service to access this pod externally:
cat service.yaml

apiVersion: v1
kind: Service
metadata:
name: my-k8s-service
spec:
type: NodePort
ports:
- port: 80
nodePort: 30000
selector:
app: http-content

kubectl create --filename service.yaml
Access the service via IP adress:
curl 192.168.121.63:30000
...
Thank you for using nginx.

NotesI will try to get this blog post in a Debian Wiki article, or maybe in the kubernetes-node documentation. Blog posts deprecate and disappear, wiki and project docs live longer.

16 March 2021

Tianon Gravi: My Docker Install Process (re-redux)

See My Docker Install Process and My Docker Install Process (redux) . This one s going to be even more to-the-point.

grab Docker s APT repo GPG key
GNUPGHOME="$(mktemp -d)"; export GNUPGHOME
gpg --keyserver ha.pool.sks-keyservers.net --recv-keys 9DC858229FC7DD38854AE2D88D81803C0EBFCD88
sudo mkdir -p /etc/apt/tianon.gpg.d
gpg --export --armor 9DC858229FC7DD38854AE2D88D81803C0EBFCD88   sudo tee /etc/apt/tianon.gpg.d/docker.gpg.asc
rm -rf "$GNUPGHOME"

add Docker s APT source
source /etc/os-release
echo "deb [ arch=amd64 signed-by=/etc/apt/tianon.gpg.d/docker.gpg.asc ] https://download.docker.com/linux/debian $VERSION_CODENAME stable"   sudo tee /etc/apt/sources.list.d/docker.list
$ sudo apt update
...
Get:6 https://download.docker.com/linux/debian buster/stable amd64 Packages [17.8 kB]
...
Reading package lists... Done

exclude (unwated) CLI plugins
echo 'path-exclude /usr/libexec/docker/cli-plugins/*'   sudo tee /etc/dpkg/dpkg.cfg.d/unwanted-docker-cli-plugins

pin Docker versions
sudo vim /etc/apt/preferences.d/docker.pref
Package: *aufs* *rootless* cgroupfs-mount
Pin: version *
Pin-Priority: -10
Package: docker*
Pin: version 5:20.10*
Pin-Priority: 999
Package: containerd*
Pin: version 1.4*
Pin-Priority: 999

pre-configure Docker
sudo mkdir -p /etc/docker
sudo vim /etc/docker/daemon.json
 
	"storage-driver": "overlay2"
 

configure boot parameters
I usually set a few boot parameters as well (in /etc/default/grub s GRUB_CMDLINE_LINUX_DEFAULT option run sudo update-grub after adding these, space-separated).
  • cgroup_enable=memory enable memory accounting for containers (allows docker run --memory for setting hard memory limits on containers)
  • swapaccount=1 enable swap accounting for containers (allows docker run --memory-swap for setting hard swap memory limits on containers)
  • vsyscall=emulate allow older binaries to run (debian:wheezy, etc.; see docker/docker#28705)
  • systemd.legacy_systemd_cgroup_controller=yes newer versions of systemd may disable the legacy cgroup interfaces Docker currently uses; this instructs systemd to keep those enabled (for more details, see systemd/systemd#4628, opencontainers/runc#1175, docker/docker#28109)
    • NOTE: this one gets more complicated in Debian 11+ ( Bullseye ); possibly worth switching to cgroupv2 and systemd.unified_cgroup_hierarchy=1
All together:
...
GRUB_CMDLINE_LINUX_DEFAULT="cgroup_enable=memory swapaccount=1 vsyscall=emulate systemd.legacy_systemd_cgroup_controller=yes"
...
(Don t forget to sudo update-grub and potentially reboot check /proc/cmdline to verify.)

install Docker!
$ sudo apt-get install -V docker-ce
...
Unpacking containerd.io (1.4.4-1) ...
...
Unpacking docker-ce-cli (5:20.10.5~3-0~debian-buster) ...
...
Unpacking docker-ce (5:20.10.5~3-0~debian-buster) ...
...

$ sudo usermod -aG docker "$(id -un)"

13 March 2021

Enrico Zini: nspawn-runner and btrfs

This post is part of a series about trying to setup a gitlab runner based on systemd-nspawn. I published the polished result as nspawn-runner on GitHub. systemd-nspawn has an interesting --ephemeral option that sets up temporary copy-on-write filesystem snapshots on filesystems that support it, like btrfs. Using copy on write means that one could perform maintenance on the source chroots, without disrupting existing CI sessions. btrfs and copy on write btrfs snapshots work on subvolumes. As I understand it, if one uses btrfs subvolume create instead of mkdir, what is inside the resulting directory is managed as a subvolume that can be snapshotted and managed in all sorts of interesting ways. I managed to delete a subvolume equally well with btrfs subvolume delete and with rm -r. btrfs subvolume snapshot src dst is similar to cp -a, but it makes a copy-on-write snapshot of a btrfs subvolume. If I change nspawn-runner to manage each chroot in its own subvolume, I should be able to build on all these features, and systemd-nspawn should be able to do that, too. There's a cute shortcut to migrate a subdirectory to a subvolume: create the subvolume, then use cp -r --reflink to populate the subvolume with the directory contents. systemd-nspawn and btrfs Passing -x/--ephemeral to systemd-nspawn makes it do all the transient copy-on-write work automatically:
# systemd-nspawn -xD buster
Spawning container buster-7fd47ac79296c5d3 on /var/lib/nspawn-runner/t/.#machine.buster0939fbc61fcbca28.
Press ^] three times within 1s to kill container.
root@buster-7fd47ac79296c5d3:~# mkdir foo
root@buster-7fd47ac79296c5d3:~# ls -la
total 12
drwx------ 1 root root  62 Mar 13 16:30 .
drwxr-xr-x 1 root root 154 Mar 13 16:26 ..
-rw------- 1 root root 102 Mar 13 16:26 .bash_history
-rw-r--r-- 1 root root 570 Mar 13 16:26 .bashrc
-rw-r--r-- 1 root root 148 Mar 13 16:26 .profile
drwxr-xr-x 1 root root   0 Mar 13 16:30 foo
root@buster-7fd47ac79296c5d3:~# logout
Container buster-7fd47ac79296c5d3 exited successfully.
root@runner2:/var/lib/nspawn-runner/t# ls -la buster/root/
totale 12
drwx------ 1 root root  56 mar 13 16:26 .
drwxr-xr-x 1 root root 154 mar 13 16:26 ..
-rw------- 1 root root 102 mar 13 16:26 .bash_history
-rw-r--r-- 1 root root 570 mar 13 16:26 .bashrc
-rw-r--r-- 1 root root 148 mar 13 16:26 .profile
It also works on a directory that is not a subvolume, making reflinks of its contents instead of a subvolume snapshot, although this has a performance penalty on setup: Snapshotting a subvolume:
# time systemd-nspawn -xD buster ls
Spawning container buster-7ab8f4123420b5d5 on /var/lib/nspawn-runner/t/.#machine.bustercd54ef4971229ff5.
Press ^] three times within 1s to kill container.
bin  boot  dev  etc  home  lib  lib32  lib64  libx32  media  mnt  opt  proc  root  run  sbin  srv  sys  tmp  usr  var
Container buster-7ab8f4123420b5d5 exited successfully.
real    0m0,164s
user    0m0,032s
sys 0m0,014s
Reflink-ing a subdirectory:
# time systemd-nspawn -xD buster ls
Spawning container buster-ebc9dc77db0c972d on /var/lib/nspawn-runner/.#machine.buster2ecbcbd1a1a058b8.
Press ^] three times within 1s to kill container.
bin  boot  dev  etc  home  lib  lib32  lib64  libx32  media  mnt  opt  proc  root  run  sbin  srv  sys  tmp  usr  var
Container buster-ebc9dc77db0c972d exited successfully.
real    0m3,022s
user    0m0,326s
sys 0m2,406s
Detecting filesystem type I can change nspawn-runner to use btrfs-specific features only when /var/lib/nspawn-runner is on btrfs. Here's a command to detect the filesystem type:
# stat -f -c %T /var/lib/nspawn-runner/
btrfs
nspawn-runner updated I've refactored nspawn-runner splitting backend and frontend code, and implementing multiple backends based on what's the filesystem type of /var/lib/nspawn-runner/. It works really nicely, and with no special configuration required: if /var/lib/nspawn-runner is on btrfs, things run faster, with less kludges, and one can do maintenance on the base chroots without interfering with running CI jobs. Next step The next step is making it easier to configure and maintain chroots. For example, it should be possible to maintain a rolling testing or sid chroot without the need to manually log into it to run apt upgrade.

12 March 2021

Ryan Kavanagh: Static Comments in Hugo

I switched from Jekyll to Hugo last week for a variety of reasons. One thing that was missing was a port of the jekyll-static-comments plugin that I used to use. I liked it because it saved readers from being tracked by Disqus or other comments solutions, and it required no javascript. To comment, users would email me their comment following a template attached to the bottom of each post. I then piped their email through a script to add it to the right post. As an added benefit, I could delegate comment spam detection to my mail server. I ve managed to reimplement this setup using Hugo. For those who are interested in a similar setup, here is what you need to do.

Pages with comments Instead of being single files, pages need to be leaf bundles. For example, this means that your blog post must be located at /content/blog/2021-03-12-static-comments-in-hugo/index.md instead of /content/blog/2021-03-12-static-comments-in-hugo.md. This lets you store the comments as page resources in the subdirectory /content/blog/2021-03-12-static-comments-in-hugo/comments/.

Partials You should create a comments.html partial and include it in the layout for the pages which should get comments:
<div class="post-comments">
  <p class="comment-notice"><b>Comments</b>: To comment on this post,
	send me an email following the template below. Your email address
	will not be posted, unless you choose to include it in
	the <span style="font-family: monospace;">link:</span> field.</p>
  <pre class="comment-notice">
To: Your Name &lt;your.email<span>@</span>example.org&gt;
Subject: [blog-comment]   .Page.RelPermalink  
post_id:   .Page.RelPermalink  
author: [How should you be identified? Usually your name or "Anonymous"]
link: [optional link to your website]
Your comments here. Markdown syntax accepted.</pre>
    $scratch := newScratch  
    $scratch.Set "comments" (.Resources.Match "comments/*yml")  
    if eq 1 (len ($scratch.Get "comments"))  
  <h2>1 Comment</h2>
    else  
  <h2>  len ($scratch.Get "comments")   Comments</h2>
    end  
    range ($scratch.Get "comments")  
  <div class="post-comment  % cycle 'odd', 'even' % ">
	  $comment := (.Content   transform.Unmarshal)  
	<span class="post-meta">
		 - $comment.date   dateFormat "Jan 2, 2006 at 15:04" - 
	</span>
	<h3 class="comment-header">
	    if $comment.link  
	  <a href="  $comment.link  ">  $comment.author  </a>
	    else  
	    $comment.author  
	    end  
	  <br />
	</h3>
	  $comment.comment   markdownify  
  </div>
    end  
</div>

Comments To associate comments received by email to posts, I pipe them from mutt (using the keybinding) to the following (admittedly janky) shell script. It takes the comment, reformats it appropriately, and puts it in the post s comments subdirectory. Note that it determines which filename to use based on the email s contents, so make sure to check that the email doesn t contain anything nefarious before you pipe it into the script!
#!/bin/sh
# Copyright (C) 2016-2021 Ryan Kavanagh <rak@rak.ac>
# Distributed under the ISC license
BLOG_BASE="/media/t/work/blog"
MESSAGE=$(cat)
EMAIL=$(echo "$ MESSAGE "   grep "From:"   sed -e 's/From[^<]*<\?\([^>]*\)>\?.*/\1/g;s/@/-at-/g')
DATE=$(echo "$ MESSAGE "   grep "Date:"   sed -e 's/Date:\s*//g'   xargs -0 date -Iseconds -u -d)
POST_ID=$(echo "$ MESSAGE "   grep "post_id:"   sed -e 's/post_id: //g')
COMMENTS_DIR="$ BLOG_BASE /content/$ POST_ID /comments/"
COMMENT_FILE="$ COMMENTS_DIR /$ DATE _$ EMAIL .yml"
# Strip out the email headers and whitespace until the start of the comment
COMMENT_WHOLE=$(echo "$ MESSAGE "   sed -e '/^\s*$/,$!d;/^[^\s]/,$!d')
# Indent everything after the comment header
COMMENT_INDENTED=$(echo "$ COMMENT_WHOLE "   sed -e '/^\s*$/,$ s/.*/  &/g ')
# And add the comment header
COMMENT_PREFIXED=$(echo "$ COMMENT_INDENTED "   sed -e '0,/^\s*$/ s/^\s*$/comment:  / ')
[ -d "$ COMMENTS_DIR " ]   mkdir -p "$ COMMENTS_DIR "
echo "Saving the comment to $ COMMENT_FILE "
echo "date: $ DATE "   tee "$ COMMENT_FILE "
echo "$ COMMENT_PREFIXED "   tee -a "$ COMMENT_FILE "
For example, the following comment in an email body:
post_id: /blog/2021-03-12-static-comments-in-hugo/
author: Ryan Kavanagh
link: https://rak.ac/
Dear self,
Here is a test comment for your blog post.
It supports *markdown* **syntax** and  stuff .
Best,
Yourself
results in a file content/blog/2021-03-12-static-comments-in-hugo/comments/2021-03-12T18:47:25+00:00_rak-at-example.org.yml containing:
date: 2021-03-12T18:47:25+00:00
post_id: /blog/2021-03-12-static-comments-in-hugo/
author: Ryan Kavanagh
link: https://rak.ac/
comment:  
  Dear self,

  Here is a test comment for your blog post.
  It supports *markdown* **syntax** and  stuff .

  Best,
  Yourself  
You can see the rendered output at the bottom of this page.

9 March 2021

Sylvestre Ledru: Debian running on Rust coreutils

tldr: Rust/coreutils ( https://github.com/uutils/coreutils/ ) is now available in Debian, good enough to boot a Debian with GNOME, install the top 1000 packages, build Firefox, the Linux Kernel and LLVM/Clang. Even if I wrote more than 100 patches to achieve that, it will probably be a bumpy ride for many other use cases.
It is also a terrific project to learn Rust. See the list of good first bugs. Even if I see Rust code every day at Mozilla, I was looking for an actual personal project (i.e. this isn't a Mozilla project) to learn Rust during the various COVID lockdowns. I started contributing to the alternative Coreutils developed in Rust. The project aims at proposing a drop-in replacement of the C-based GNU Coreutils, and I wanted to evaluate if this could be used to run a regular Debian. Similar to what I have done with clang.debian.net a few years ago (rebuilding the Debian archive using clang instead of gcc). I expect that most of the readers know what is the Coreutils. It is a set of programs performing simple operations (copy/move file, change permissions/ownership, etc). Even if some commands are from the 70s, they are at the base of Linux, Unix and macOS. While different implementations can be found, they are trying to remain compatible in terms of arguments, options, etc. This implementation of Coreutils isn t different! If you want to learn more about the history of Unix, I recommend this great Corecursive podcast with Brian Kernighan. While a lot of people contributed to this project, much was left to be done: To start easy, I defined 4 goals for this work:
  1. Package Coreutils in Debian/Ubuntu
  2. Boot a Debian system with a Rust-based coreutils
  3. Install the top 1000 packages in Debian - including GNOME
  4. Build Firefox, the Linux Kernel and LLV/Clang

Packaging of Coreutils in Debian Packaging in Debian isn't a trivial or even simple task. It requires uploading independently all the dependencies in the archive. Rust, with its new ecosystem and small crates, is making this task significantly harder. The package is called rust-coreutils - https://tracker.debian.org/pkg/rust-coreutils For Debian/Ubuntu users, to have an idea of the complexity of packaging such applications, just run
debtree --build-dep rust-coreutils dot -Tsvg > coreutils.svg (should be around 1M). Since it isn't production ready, the rust-coreutils is installable in parallel with coreutils. This package does NOT replace the GNU/coreutils files (yet?), the new files are installed in /usr/lib/cargo/bin/. They can be used with: export PATH=/usr/lib/cargo/bin/:$PATH Or, uglier, overriding the files with the new ones.

Booting Debian with rust-coreutils To achieve this, because I knew I would likely break the image a few times, I created a new project to quickly install a full Debian with PXE and preseed. The project is available here: https://github.com/opencollab/qemu-debian-install-pxe-preseed/ A script to create the full qemu image: build_qemu_debian_image.sh A second script to boot on the newly created image: boot.sh Then, building and installing coreutils on the system (yeah, it is ugly - don t do that at home): apt install rust-coreutils
cd /usr/lib/cargo/bin/
for f in *; do
cp -f $f /usr/bin/
done
First surprise, unlike the old init.d init system, as systemd is not relying on a series of scripts (it is mostly written in C), replacing the coreutils did not have an impact. Therefore, I didn't experience any issue during the boot process

Implementing missing options A significant number of problems could be easily identified as a lack of support for some options. Here is a list of most of the fixes I had to implement to make this plan work:

Different behavior Most of the programs behaved as expected. Here is a list of differences:
  • install doesn't support using /dev/null as source file
    Setting up libreoffice-common (1:6.1.5-3+deb10u6) ...
    install: error: install: cannot install /dev/null to /etc/apparmor.d/local/usr.lib.libreoffice.program.oosplash : the source path is not an existing regular file
    A limitation of rust itself https://github.com/rust-lang/rust/issues/79390

Compile Firefox, Clang and the Linux Kernel Build systems can vary significantly one from the other. To verify their usage of coreutils, I built these three major projects

Firefox As Firefox relies mostly on Python as a build system, it went smoothly. I didn t encounter any issue. The only unrelated issue that I noticed working on it was apt-key was broken because the script relied on a buggy option of mktemp.

Linux Kernel I identified only two issues compared to GNU Coreutils:
  • The chown command on a non-existing symlink target doesn t fail on the GNU version, the Rust one was triggering an error.
    https://github.com/uutils/coreutils/pull/1694
  • Linux kernel
    ln -fsn ../../x86/boot/bzImage ./arch/x86_64/boot/bzImage
    ln: error: Unrecognized option: 'n'

LLVM/Clang The llvm toolchain relies on Cmake. Just like for Firefox, I didn t face any issue.

Comparing with GNU coreutils using its testsuite Recently, James Robson added a new test to run the GNU testsuite on the Rust/coreutils.

# TOTAL: 611
# PASS: 144
# SKIP: 86
# XFAIL: 0
# FAIL: 342
# XPASS: 0
# ERROR: 39
compared to 546 test passing with the GNU version. Even if a bunch of errors are just different outputs, it demonstrates that there is still a long road ahead.

Next steps & contribute First, we will need more motivated contributors to work on this project. Many features remain to be implemented, optimizations to be done (e.g. decreasing the memory usage), etc.
I started to create a list of good first bugs for newcomers: https://github.com/uutils/coreutils/issues?q=is%3Aissue+is%3Aopen+label%3A%22Good+first+bug%22
I will update this list of there is some interest for this project.
Helping improve the support of the GNU coreutils testsuite would be a huge step while being a great way to learn Rust! Then, once it is in a better state, we will be able to make it a reliable alternative in Debian/Ubuntu to the GNU/Coreutils. This might be also interesting for other folks who prefer a BSD license over a GPL.

1 March 2021

Dirk Eddelbuettel: RPushbullet 0.3.4: Small Update, Nicer Docs

RPpushbullet demo Release 0.3.4 of the RPushbullet package arrived on CRAN today. RPushbullet interfaces the neat Pushbullet service for inter-device messaging, communication, and more. It lets you easily send (programmatic) alerts like the one to the left to your browser, phone, tablet, or all at once. This release contains a contributed PR to better reflect an error code, and adds a mkdocs-material-based documentation site (just like a few other packages of mine). See below for more details.

Changes in version 0.3.4 (2021-03-01)
  • Return code checking using error code content if it exists (Thomas Shafer in #64).
  • Enabled GitHub Actions with encrypted JSON file for API access.
  • Added a package documentation website.

Courtesy of my CRANberries, there is also a diffstat report for this release. More details about the package are at the RPushbullet webpage and the RPushbullet GitHub repo. If you like this or other open-source work I do, you can now sponsor me at GitHub.

This post by Dirk Eddelbuettel originated on his Thinking inside the box blog. Please report excessive re-aggregation in third-party for-profit settings.

16 February 2021

Michael Prokop: How to properly use 3rd party Debian repository signing keys with apt

(Blogging this, since this is a recurring anti-pattern I noticed at several customers and often comes up during deployments of 3rd party repositories.) Update on 2021-02-19: clarified, that Signed-By requires apt >= 1.1, thanks Vincent Bernat Many upstream projects provide Debian repository instructions like this:
curl -fsSL https://example.com/stable/debian.gpg   sudo apt-key add -
Do not follow this, for different reasons, including:
  1. You do not see what you get before adding the GPG key to your global apt trust store
  2. You can t easily script this via your preferred configuration management (the apt-key manpage clearly discourages programmatic usage)
  3. The signing key is considered valid for all your enabled Debian repositories (instead of only a specific one)
  4. You need GnuPG (either gnupg2 or gnupg1) on your system for usage with apt-key
There s a much better approach to this: download the GPG key, make sure it s in the appropriate format, then use it via deb [signed-by=/usr/share/keyrings/ ] in your apt s sources list configuration. Note and FTR: the Signed-By feature is available starting with apt 1.1 (so apt in Debian jessie/8 and older does not support it). TL;DR: As an example, let s demonstrate this with the Tailscale Debian repository for buster.
Downloading the GPG file will give you an ascii-armored GPG file:
% curl -fsSL -o buster.gpg https://pkgs.tailscale.com/stable/debian/buster.gpg
% gpg --keyid-format long buster.gpg 
gpg: WARNING: no command supplied.  Trying to guess what you mean ...
pub   rsa4096/458CA832957F5868 2020-02-25 [SC]
      2596A99EAAB33821893C0A79458CA832957F5868
uid                           Tailscale Inc. (Package repository signing key) <info@tailscale.com>
sub   rsa4096/B1547A3DDAAF03C6 2020-02-25 [E]
% file buster.gpg
buster.gpg: PGP public key block Public-Key (old)
If you have apt version >= 1.4 available (Debian >=stretch/9 and Ubuntu >=bionic/18.04), you can use this file directly as follows:
% sudo mv buster.gpg /usr/share/keyrings/tailscale.asc
% cat /etc/apt/sources.list.d/tailscale.list
deb [signed-by=/usr/share/keyrings/tailscale.asc] https://pkgs.tailscale.com/stable/debian buster main
% sudo apt update
[...]
And you re done! Iff your apt version really is older than 1.4, you need to convert the ascii-armored GPG file into a GPG key public ring file (AKA binary OpenPGP format), either by just dearmor-ing it (if you don t care about checking ID + fingerprint):
% gpg --dearmor < buster.gpg > tailscale.gpg
or if you prefer to go via GPG, you can also use a temporary GPG home directory (if you don t care about going through your personal GPG setup):
% mkdir --mode=700 /tmp/gpg-tmpdir
% gpg --homedir /tmp/gpg-tmpdir --import ./buster.gpg
gpg: keybox '/tmp/gpg-tmpdir/pubring.kbx' created
gpg: /tmp/gpg-tmpdir/trustdb.gpg: trustdb created
gpg: key 458CA832957F5868: public key "Tailscale Inc. (Package repository signing key) <info@tailscale.com>" imported
gpg: Total number processed: 1
gpg:               imported: 1
% gpg --homedir /tmp/gpg-tmpdir --output tailscale.gpg  --export-options=export-minimal --export 0x458CA832957F5868
% rm -rf /tmp/gpg-tmpdir
The resulting GPG key public ring file should look like that:
% file tailscale.gpg 
tailscale.gpg: PGP/GPG key public ring (v4) created Tue Feb 25 04:51:20 2020 RSA (Encrypt or Sign) 4096 bits MPI=0xc00399b10bc12858...
% gpg tailscale.gpg 
gpg: WARNING: no command supplied.  Trying to guess what you mean ...
pub   rsa4096/458CA832957F5868 2020-02-25 [SC]
      2596A99EAAB33821893C0A79458CA832957F5868
uid                           Tailscale Inc. (Package repository signing key) <info@tailscale.com>
sub   rsa4096/B1547A3DDAAF03C6 2020-02-25 [E]
Then you can use this GPG file on your system as follows:
% sudo mv tailscale.gpg /usr/share/keyrings/tailscale.gpg
% cat /etc/apt/sources.list.d/tailscale.list
deb [signed-by=/usr/share/keyrings/tailscale.gpg] https://pkgs.tailscale.com/stable/debian buster main
% sudo apt update
[...]
Such a setup ensures:
  1. You can verify the GPG key file (ID + fingerprint)
  2. You can easily ship files via /usr/share/keyrings/ and refer to it in your deployment scripts, configuration management, (and can also easily update or get rid of them again!)
  3. The GPG key is valid only for the repositories with the corresponding [signed-by=/usr/share/keyrings/ ] entry
  4. You don t need to install GnuPG (neither gnupg2 nor gnupg1) on the system which is using the 3rd party Debian repository
Thanks: Guillem Jover for reviewing an early draft of this blog article.

14 February 2021

Fran ois Marier: Creating a Kodi media PC using a Raspberry Pi 4

Here's how I set up a media PC using Kodi (formerly XMBC) and a Raspberry Pi 4.

Hardware The hardware is fairly straightforward, but here's what I ended up getting: You'll probably want to add a remote control to that setup. I used an old Streamzap I had lying around.

Installing the OS on the SD-card Plug the SD card into a computer using a USB adapter. Download the imager and use it to install Raspbian on the SDcard. Then you can simply plug the SD card into the Pi and boot.

System configuration Using sudo raspi-config, I changed the following:
  • Set hostname (System Options)
  • Wait for network at boot (System Options): needed for NFS
  • Disable screen blanking (Display Options)
  • Enable ssh (Interface Options)
  • Configure locale, timezone and keyboard (Localisation Options)
  • Set WiFi country (Localisation Options)
Then I enabled automatic updates:
apt install unattended-upgrades anacron
echo 'Unattended-Upgrade::Origins-Pattern  
        "origin=Debian,codename=$ distro_codename ,label=Debian";
        "origin=Debian,codename=$ distro_codename ,label=Debian-Security";
        "origin=Raspbian,codename=$ distro_codename ,label=Raspbian";
        "origin=Raspberry Pi Foundation,codename=$ distro_codename ,label=Raspberry Pi Foundation";
 ;'   sudo tee /etc/apt/apt.conf.d/51unattended-upgrades-raspbian

Headless setup Should you need to do the setup without a monitor, you can enable ssh by inserting the SD card into a computer and then creating an empty file called ssh in the boot partition. Plug it into your router and boot it up. Check the IP that it received by looking at the active DHCP leases in your router's admin panel. Then login:
ssh -o PreferredAuthentications=password -o PubkeyAuthentication=no pi@192.168.1.xxx
using the default password of raspberry.

Hardening In order to secure the Pi, I followed most of the steps I usually take when setting up a new Linux server. I created a new user account for admin and ssh access:
adduser francois
addgroup sshuser
adduser francois sshuser
adduser francois sudo
and changed the pi user password to a random one:
pwgen -sy 32
sudo passwd pi
before removing its admin permissions:
deluser pi adm
deluser pi sudo
deluser pi dialout
deluser pi cdrom
deluser pi lpadmin
Finally, I enabled the Uncomplicated Firewall by installing its package:
apt install ufw
and only allowing ssh connections. After starting ufw using systemctl start ufw.service, you can check that it's configured as expected using ufw status. It should display the following:
Status: active
To                         Action      From
--                         ------      ----
22/tcp                     ALLOW       Anywhere
22/tcp (v6)                ALLOW       Anywhere (v6)

Installing Kodi Kodi is very straightforward to install since it's now part of the Raspbian repositories:
apt install kodi
To make it start at boot/login, while still being able to exit and use other apps if needed:
cp /etc/xdg/lxsession/LXDE-pi/autostart ~/.config/lxsession/LXDE-pi/
echo "@kodi" >> ~/.config/lxsession/LXDE-pi/autostart

Network File System In order to avoid having to have all media storage connected directly to the Pi via USB, I setup an NFS share over my local network. First, give static IP allocations to the server and the Pi in your DHCP server, then add it to the /etc/hosts file on your NFS server:
192.168.1.3    pi
Install the NFS server package:
apt instal nfs-kernel-server
Setup the directories to share in /etc/exports:
/pub/movies    pi(ro,insecure,all_squash,subtree_check)
/pub/tv_shows  pi(ro,insecure,all_squash,subtree_check)
Open the right ports on your firewall by putting this in /etc/network/iptables.up.rules:
-A INPUT -s 192.168.1.3 -p udp -j ACCEPT
-A INPUT -s 192.168.1.0/24 -p tcp --dport 111 -j ACCEPT
-A INPUT -s 192.168.1.0/24 -p udp --dport 111 -j ACCEPT
-A INPUT -s 192.168.1.0/24 -p udp --dport 123 -j ACCEPT
-A INPUT -s 192.168.1.0/24 -p tcp --dport 600:1124 -j ACCEPT
-A INPUT -s 192.168.1.0/24 -p udp --dport 600:1124 -j ACCEPT
-A INPUT -s 192.168.1.0/24 -p tcp --dport 2049 -j ACCEPT
-A INPUT -s 192.168.1.0/24 -p udp --dport 2049 -j ACCEPT
Finally, apply all of these changes:
iptables-apply
systemctl restart nfs-kernel-server.service
On the Pi, put the server's static IP in /etc/hosts:
192.168.1.2    fileserver
and this in /etc/fstab:
fileserver:/data/movies  /kodi/movies  nfs  ro,bg,hard,noatime,async,nolock  0  0
fileserver:/data/tv      /kodi/tv      nfs  ro,bg,hard,noatime,async,nolock  0  0
Then create the mount points and mount everything:
mkdir -p /kodi/movies
mkdir /kodi/tv
mount /kodi/movies
mount /kodi/tv

3 February 2021

Daniel Lange: Compiling and installing the Gentoo Linux kernel on emerge without genkernel (part 2)

The first install of a Gentoo kernel needs to be somewhat manual if you want to optimize the kernel for the (virtual) system it boots on. In part 1 I laid out how to improve the subsequent emerges of sys-kernel/gentoo-sources with a small drop in script to build the kernel as part of the ebuild. Since end of last year Gentoo also supports a less manual way of emerging a kernel: The following kernel blends are available: So a quick walk-through for the gentoo-kernel variant: 1. Set up the correct package USE flags We do not want an initrd and we want our own config to be re-used so:
echo "sys-kernel/gentoo-kernel -initramfs savedconfig" >> /etc/portage/package.use/gentoo-kernel
2. Preseed the saved config The current kernel config needs to be saved as the initial savedconfig so it is found and applied for our emerge below:
mkdir -p /etc/portage/savedconfig/sys-kernel
cp -n "/usr/src/linux-$(uname -r)/.config" /etc/portage/savedconfig/sys-kernel/gentoo-kernel
3. Emerge the new kernel
emerge sys-kernel/gentoo-kernel
4. Update grub and reboot Unfortunately this ebuild does not update grub, so we have to run grub-mkconfig manually. This can again be automated via a post_pkg_postinst() script. See the step 7 below. But for now, let's do it manually:
grub-mkconfig -o /boot/grub/grub.cfg
# All fine? Time to reboot the machine:
reboot
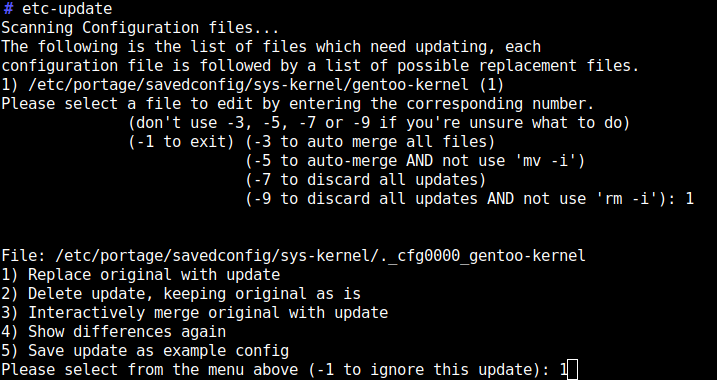
5. (Optional) Prepare for the next kernel build Run etc-update and merge the new kernel config entries into your savedconfig. Screenshot of etc-update The kernel should auto-build once new versions become available via portage. Again the etc-update can be automated if you feel that is sufficiently safe to do in your environment. See step 7 below for details. 6. (Optional) Remove the old kernel sources If you want to switch from the method based on gentoo-sources to the gentoo-kernel one, you can remove the kernel sources:
emerge -C "=sys-kernel/gentoo-sources-5*"
Be sure to update the /usr/src/linux symlink to the new kernel sources directory from gentoo-kernel, e.g.:
rm /usr/src/linux; ln -s "/usr/src/$(uname -r)" /usr/src/linux
This may be a good time for a bit more house-keeping: Clean up a bit in /usr/src/ to remove old build artefacts, /boot/ to remove old kernels and /lib/modules/ to get rid of old kernel modules. 7. (Optional) Further automate the ebuild In part 1 we automated the kernel compile, install and a bit more via a helper function for post_pkg_postinst(). We can do the similarly for what is (currently) missing from the gentoo-kernel ebuilds: Create /etc/portage/env/sys-kernel/gentoo-kernel with the following:
post_pkg_postinst()
etc-update --automode -5 /etc/portage/savedconfig/sys-kernel
grub-mkconfig -o /boot/grub/grub.cfg
The upside of gentoo-kernel over gentoo-sources is that you can put "config override files" in /etc/kernel/config.d/. That way you theoretically profit from config improvements made by the upstream developers. See the Gentoo distribution kernel documentation for a sample snippet. I am fine with savedconfig for now but it is nice that Gentoo provides the flexibility to support both approaches.

22 January 2021

Enrico Zini: Assembling the custom runner

This post is part of a series about trying to setup a gitlab runner based on systemd-nspawn. I published the polished result as nspawn-runner on GitHub. The plan Back to custom runners, here's my plan: The scripts Here are the scripts based on Federico's work: base.sh with definitions sourced by all scripts:
MACHINE="run-$CUSTOM_ENV_CI_JOB_ID"
ROOTFS="/var/lib/gitlab-runner-custom-chroots/buster"
OVERLAY="/var/lib/gitlab-runner-custom-chroots/$MACHINE"
config.sh doing nothing:
#!/bin/sh
exit 0
prepare.sh starting the machine:
#!/bin/bash
source $(dirname "$0")/base.sh
set -eo pipefail
# trap errors as a CI system failure
trap "exit $SYSTEM_FAILURE_EXIT_CODE" ERR
logger "gitlab CI: preparing $MACHINE"
mkdir -p $OVERLAY
systemd-run \
  -p 'KillMode=mixed' \
  -p 'Type=notify' \
  -p 'RestartForceExitStatus=133' \
  -p 'SuccessExitStatus=133' \
  -p 'Slice=machine.slice' \
  -p 'Delegate=yes' \
  -p 'TasksMax=16384' \
  -p 'WatchdogSec=3min' \
  systemd-nspawn --quiet -D $ROOTFS \
    --overlay="$ROOTFS:$OVERLAY:/"
    --machine="$MACHINE" --boot --notify-ready=yes
run.sh running the provided scripts in the machine:
#!/bin/bash
logger "gitlab CI: running $@"
source $(dirname "$0")/base.sh
set -eo pipefail
trap "exit $SYSTEM_FAILURE_EXIT_CODE" ERR
systemd-run --quiet --pipe --wait --machine="$MACHINE" /bin/bash < "$1"
cleanup.sh stopping the machine and removing the writable overlay directory:
#!/bin/bash
logger "gitlab CI: cleanup $@"
source $(dirname "$0")/base.sh
machinectl stop "$MACHINE"
rm -rf $OVERLAY
Trying out the plan I tried a manual invocation of gitlab-runner, and it worked perfectly:
# mkdir /var/lib/gitlab-runner-custom-chroots/build/
# mkdir /var/lib/gitlab-runner-custom-chroots/cache/
# gitlab-runner exec custom \
    --builds-dir /var/lib/gitlab-runner-custom-chroots/build/ \
    --cache-dir /var/lib/gitlab-runner-custom-chroots/cache/ \
    --custom-config-exec /var/lib/gitlab-runner-custom-chroots/config.sh \
    --custom-prepare-exec /var/lib/gitlab-runner-custom-chroots/prepare.sh \
    --custom-run-exec /var/lib/gitlab-runner-custom-chroots/run.sh \
    --custom-cleanup-exec /var/lib/gitlab-runner-custom-chroots/cleanup.sh \
    tests
Runtime platform                                    arch=amd64 os=linux pid=18662 revision=775dd39d version=13.8.0
Running with gitlab-runner 13.8.0 (775dd39d)
Preparing the "custom" executor
Using Custom executor...
Running as unit: run-r1be98e274224456184cbdefc0690bc71.service
executor not supported                              job=1 project=0 referee=metrics
Preparing environment
Getting source from Git repository
Executing "step_script" stage of the job script
WARNING: Starting with version 14.0 the 'build_script' stage will be replaced with 'step_script': https://gitlab.com/gitlab-org/gitlab-runner/-/issues/26426
Job succeeded
Deploy The remaining step is to deploy all this in /etc/gitlab-runner/config.toml:
concurrent = 1
check_interval = 0
[session_server]
  session_timeout = 1800
[[runners]]
  name = "nspawn runner"
  url = "http://gitlab.siweb.local/"
  token = " "
  executor = "custom"
  builds_dir = "/var/lib/gitlab-runner-custom-chroots/build/"
  cache_dir = "/var/lib/gitlab-runner-custom-chroots/cache/"
  [runners.custom_build_dir]
  [runners.cache]
    [runners.cache.s3]
    [runners.cache.gcs]
    [runners.cache.azure]
  [runners.custom]
    config_exec = "/var/lib/gitlab-runner-custom-chroots/config.sh"
    config_exec_timeout = 200
    prepare_exec = "/var/lib/gitlab-runner-custom-chroots/prepare.sh"
    prepare_exec_timeout = 200
    run_exec = "/var/lib/gitlab-runner-custom-chroots/run.sh"
    cleanup_exec = "/var/lib/gitlab-runner-custom-chroots/cleanup.sh"
    cleanup_exec_timeout = 200
    graceful_kill_timeout = 200
    force_kill_timeout = 200
Next steps My next step will be polishing all this in a way that makes deploying and maintaining a runner configuration easy.

Enrico Zini: Exploring nspawn for CIs

This post is part of a series about trying to setup a gitlab runner based on systemd-nspawn. I published the polished result as nspawn-runner on GitHub. Here I try to figure out possible ways of invoking nspawn for the prepare, run, and cleanup steps of gitlab custom runners. The results might be useful invocations beyond Gitlab's scope of application. I begin with a chroot which will be the base for our build environments:
debootstrap --variant=minbase --include=git,build-essential buster workdir
Fully ephemeral nspawn This would be fantastic: set up a reusable chroot, mount readonly, run the CI in a working directory mounted on tmpfs. It sets up quickly, it cleans up after itself, and it would make prepare and cleanup noops:
mkdir workdir/var/lib/gitlab-runner
systemd-nspawn --read-only --directory workdir --tmpfs /var/lib/gitlab-runner "$@"
However, run gets run multiple times, so I need the side effects of run to persist inside the chroot between runs. Also, if the CI uses a large amount of disk space, tmpfs may get into trouble. nspawn with overlay Federico used --overlay to keep the base chroot readonly while allowing persistent writes on a temporary directory on the filesystem. Note that using --overlay requires systemd and systemd-container from buster-backports because of systemd bug #3847. Example:
mkdir -p tmp-overlay
systemd-nspawn --quiet -D workdir \
  --overlay=" pwd /workdir: pwd /tmp-overlay:/"
I can run this twice, and changes in the file system will persist between systemd-nspawn executions. Great! However, any process will be killed at the end of each execution. machinectl I can give a name to systemd-nspawn invocations using --machine, and it allows me to run multiple commands during the machine lifespan using machinectl and systemd-run. In theory machinectl can also fully manage chroots and disk images in /var/lib/machines, but I haven't found a way with machinectl to start multiple machines sharing the same underlying chroot. It's ok, though: I managed to do that with systemd-nspawn invocations. I can use the --machine=name argument to systemd-nspawn to make it visible to machinectl. I can use the --boot argument to systemd-nspawn to start enough infrastructure inside the container to allow machinectl to interact with it. This gives me any number of persistent and named running systems, that share the same underlying chroot, and can cleanup after themselves. I can run commands in any of those systems as I like, and their side effects persist until a system is stopped. The chroot needs systemd and dbus for machinectl to be able to interact with it:
debootstrap --variant=minbase --include=git,systemd,systemd,build-essential buster workdir
Let's boot the machine:
mkdir -p overlay
systemd-nspawn --quiet -D workdir \
    --overlay=" pwd /workdir: pwd /overlay:/"
    --machine=test --boot
Let's try machinectl:
# machinectl list
MACHINE CLASS     SERVICE        OS     VERSION ADDRESSES
test    container systemd-nspawn debian 10      -
1 machines listed.
# machinectl shell --quiet test /bin/ls -la /
total 60
[ ]
To run commands, rather than machinectl shell, I need to use systemd-run --wait --pipe --machine=name, otherwise machined won't forward the exit code. The result however is pretty good, with working stdin/stdout/stderr redirection and forwarded exit code. Good, I'm getting somewhere. The terminal where I ran systemd-nspawn is currently showing a nice getty for the booted system, which is cute, and not what I want for the setup process of a CI. Spawning machines without needing a terminal machinectl uses /lib/systemd/system/systemd-nspawn@.service to start machines. I suppose there's limited magic in there: start systemd-nspawn as a service, use --machine to give it a name, and machinectl manages it as if it started it itself. What if, instead of installing a unit file for each CI run, I try to do the same thing with systemd-run?
systemd-run \
  -p 'KillMode=mixed' \
  -p 'Type=notify' \
  -p 'RestartForceExitStatus=133' \
  -p 'SuccessExitStatus=133' \
  -p 'Slice=machine.slice' \
  -p 'Delegate=yes' \
  -p 'TasksMax=16384' \
  -p 'WatchdogSec=3min' \
  systemd-nspawn --quiet -D  pwd /workdir \
    --overlay=" pwd /workdir: pwd /overlay:/"
    --machine=test --boot
It works! I can interact with it using machinectl, and fine tune DevicePolicy as needed to lock CI machines down. This setup has a race condition where if I try to run a command inside the machine in the short time window before the machine has finished booting, it fails:
# systemd-run [ ] systemd-nspawn [ ] ; machinectl --quiet shell test /bin/ls -la /
Failed to get shell PTY: Protocol error
# machinectl shell test /bin/ls -la /
Connected to machine test. Press ^] three times within 1s to exit session.
total 60
[ ]
systemd-nspawn has the option --notify-ready=yes that solves exactly this problem:
# systemd-run [ ] systemd-nspawn [ ] --notify-ready=yes ; machinectl --quiet shell test /bin/ls -la /
Running as unit: run-r5a405754f3b740158b3d9dd5e14ff611.service
total 60
[ ]
On nspawn's side, I should now have all I need. Next steps My next step will be wrapping it all together in a gitlab runner.

Enrico Zini: Gitlab runners with nspawn

This is a first post in a series about trying to setup a gitlab runner based on systemd-nspawn. I published the polished result as nspawn-runner on GitHub. The goal I need to setup gitlab runners, and I try to not involve docker in my professional infrastructure if I can avoid it. Let's try systemd-nspawn. It's widely available and reasonably reliable. I'm not the first to have this idea: Federico Ceratto made a setup based on custom runners and Josef Kufner one based on ssh runners. I'd like to skip the complication of ssh, and to expand Federico's version to persist not just filesystem changes but also any other side effect of CI commands. For example, one CI command may bring up a server and the next CI command may want to test interfacing with it. Understanding gitlab-runner First step: figuring out gitlab-runner. Test runs of gitlab-runner I found that I can run gitlab-runner manually without needing to go through a push to Gitlab. It needs a local git repository with a .gitlab-ci.yml file:
mkdir test
cd test
git init
cat > .gitlab-ci.yml << EOF
tests:
 script:
  - env   sort
  - pwd
  - ls -la
EOF
git add .gitlab-ci.yml
git commit -am "Created a test repo for gitlab-runner"
Then I can go in the repo and test gitlab-runner:
gitlab-runner exec shell tests
It doesn't seem to use /etc/gitlab-runner/config.toml and it needs all the arguments passed to its command line: I used the shell runner for a simple initial test. Later I'll try to brew a gitlab-runner exec custom invocation that uses nspawn. Basics of custom runners A custom runner runs a few scripts to manage the run: run gets at least one argument which is a path to the script to run. The other scripts get no arguments by default. The runner configuration controls the paths of the scripts to run, and optionally extra arguments to pass to them Next steps My next step will be to figure out possible ways of invoking nspawn for the prepare, run, and cleanup scripts.

12 January 2021

John Goerzen: Remote Directory Tree Comparison, Optionally Asynchronous and Airgapped

Note: this is another article in my series on asynchronous communication in Linux with UUCP and NNCP. In the previous installment on store-and-forward backups, I mentioned how easy it is to do with ZFS, and some of the tools that can be used to do it without ZFS. A lot of those tools are a bit less robust, so we need some sort of store-and-forward mechanism to verify backups. To be sure, verifying backups is good with ANY scheme, and this could be used with ZFS backups also. So let s say you have a shiny new backup scheme in place, and you d like to verify that it s working correctly. To do that, you need to compare the source directory tree on machine A with the backed-up directory tree on machine B. Assuming a conventional setup, here are some ways you might consider to do that: The first two options are not particularly practical for large datasets, though I note that the second is compatible with airgapping. Using rsync requires both systems to be online at the same time to perform the comparison. What would be really nice here is a tool that would write out lots of information about the files on a system: their names, sizes, last modified dates, maybe even sha256sum and other data. This file would be far smaller than the directory tree itself, would compress nicely, and could be easily shipped to an airgapped system via NNCP, UUCP, a USB drive, or something similar. Tool choices It turns out there are already quite a few tools in Debian (and other Free operating systems) to do this, and half of them are named mtree (though, of course, not all mtrees are compatible with each other.) We ll look at some of the options here. I ve made a simple test directory for illustration purposes with these commands:
mkdir test
cd test
echo hi > hi
ln -s hi there
ln hi foo
touch empty
mkdir emptydir
mkdir somethingdir
cd somethingdir
ln -s ../there
I then also used touch to set all files to a consistent timestamp for illustration purposes. Tool option: getfacl (Debian package: acl) This comes with the acl package, but can be used with other than ACL purposes. Unfortunately, it doesn t come with a tool to directly compare its output with a filesystem (setfacl, for instance, can apply the permissions listed but won t compare.) It ignores symlinks and doesn t show sizes or dates, so is ineffective for our purposes. Example output:
$ getfacl --numeric -R test
...
# file: test/hi
# owner: 1000
# group: 1000
user::rw-
group::r--
other::r--
...
Tool option: fmtree, the FreeBSD mtree (Debian package: freebsd-buildutils) fmtree can prepare a specification based on a directory tree, and compare a directory tree to that specification. The comparison also is aware of files that exist in a directory tree but not in the specification. The specification format is a bit on the odd side, but works well enough with fmtree. Here s a sample output with defaults:
$ fmtree -c -p test
...
# .
/set type=file uid=1000 gid=1000 mode=0644 nlink=1
.               type=dir mode=0755 nlink=4 time=1610421833.000000000
    empty       size=0 time=1610421833.000000000
    foo         nlink=2 size=3 time=1610421833.000000000
    hi          nlink=2 size=3 time=1610421833.000000000
    there       type=link mode=0777 time=1610421833.000000000 link=hi
... skipping ...
# ./somethingdir
/set type=file uid=1000 gid=1000 mode=0777 nlink=1
somethingdir    type=dir mode=0755 nlink=2 time=1610421833.000000000
    there       type=link time=1610421833.000000000 link=../there
# ./somethingdir
..
..
You might be wondering here what it does about special characters, and the answer is that it has octal escapes, so it is 8-bit clean. To compare, you can save the output of fmtree to a file, then run like this:
cd test
fmtree < ../test.fmtree
If there is no output, then the trees are identical. Change something and you get a line of of output explaining each difference. You can also use fmtree -U to change things like modification dates to match the specification. fmtree also supports quite a few optional keywords you can add with -K. They include things like file flags, user/group names, various tipes of hashes, and so forth. I'll note that none of the options can let you determine which files are hardlinked together. Here's an excerpt with -K sha256digest added:
    empty       size=0 time=1610421833.000000000 \
                sha256digest=e3b0c44298fc1c149afbf4c8996fb92427ae41e4649b934ca495991b7852b855
    foo         nlink=2 size=3 time=1610421833.000000000 \
                sha256digest=98ea6e4f216f2fb4b69fff9b3a44842c38686ca685f3f55dc48c5d3fb1107be4
If you include a sha256digest in the spec, then when you verify it with fmtree, the verification will also include the sha256digest. Obviously fmtree -U can't correct a mismatch there, but of course it will detect and report it. Tool option: mtree, the NetBSD mtree (Debian package: mtree-netbsd) mtree produces (by default) output very similar to fmtree. With minor differences (such as the name of the sha256digest in the output), the discussion above about fmtree also applies to mtree. There are some differences, and the most notable is that mtree adds a -C option which reads a spec and converts it to a "format that's easier to parse with various tools." Here's an example:
$ mtree -c -K sha256digest -p test   mtree -C
. type=dir uid=1000 gid=1000 mode=0755 nlink=4 time=1610421833.0 flags=none 
./empty type=file uid=1000 gid=1000 mode=0644 nlink=1 size=0 time=1610421833.0 flags=none 
./foo type=file uid=1000 gid=1000 mode=0644 nlink=2 size=3 time=1610421833.0 flags=none 
./hi type=file uid=1000 gid=1000 mode=0644 nlink=2 size=3 time=1610421833.0 flags=none 
./there type=link uid=1000 gid=1000 mode=0777 nlink=1 link=hi time=1610421833.0 flags=none 
./emptydir type=dir uid=1000 gid=1000 mode=0755 nlink=2 time=1610421833.0 flags=none 
./somethingdir type=dir uid=1000 gid=1000 mode=0755 nlink=2 time=1610421833.0 flags=none 
./somethingdir/there type=link uid=1000 gid=1000 mode=0777 nlink=1 link=../there time=1610421833.0 flags=none 
Most definitely an improvement in both space and convenience, while still retaining the relevant information. Note that if you want the sha256digest in the formatted output, you need to pass the -K to both mtree invocations. I could have done that here, but it is easier to read without it. mtree can verify a specification in either format. Given what I'm about to show you about bsdtar, this should illustrate why I bothered to package mtree-netbsd for Debian. Unlike fmtree, the mtree -U command will not adjust modification times based on the spec, but it will report on differences. Tool option: bsdtar (Debian package: libarchive-tools) bsdtar is a fascinating program that can work with many formats other than just tar files. Among the formats it supports is is the NetBSD mtree "pleasant" format (mtree -C compatible). bsdtar can also convert between the formats it supports. So, put this together: bsdtar can convert a tar file to an mtree specification without extracting the tar file. bsdtar can also use an mtree specification to override the permissions on files going into tar -c, so it is a way to prepare a tar file with things owned by root without resorting to tools like fakeroot. Let's look at how this can work:
$ cd test
$ bsdtar --numeric -cf - --format=mtree .

. time=1610472086.318593729 mode=755 gid=1000 uid=1000 type=dir
./empty time=1610421833.0 mode=644 gid=1000 uid=1000 type=file size=0
./foo nlink=2 time=1610421833.0 mode=644 gid=1000 uid=1000 type=file size=3
./hi nlink=2 time=1610421833.0 mode=644 gid=1000 uid=1000 type=file size=3
./ormat\075mtree time=1610472086.318593729 mode=644 gid=1000 uid=1000 type=file size=5632
./there time=1610421833.0 mode=777 gid=1000 uid=1000 type=link link=hi
./emptydir time=1610421833.0 mode=755 gid=1000 uid=1000 type=dir
./somethingdir time=1610421833.0 mode=755 gid=1000 uid=1000 type=dir
./somethingdir/there time=1610421833.0 mode=777 gid=1000 uid=1000 type=link link=../there
You can use mtree -U to verify that as before. With the --options mtree: set, you can also add hashes and similar to the bsdtar output. Since bsdtar can use input from tar, pax, cpio, zip, iso9660, 7z, etc., this capability can be used to create verification of the files inside quite a few different formats. You can convert with bsdtar -cf output.mtree --format=mtree @input.tar. There are some foibles with directly using these converted files with mtree -U, but usually minor changes will get it there. Side mention: stat(1) (Debian package: coreutils) This tool isn't included because it won't operate recursively, but is a tool in the similar toolbox. Putting It Together I will still be developing a complete non-ZFS backup system for NNCP (or UUCP) in a future post. But in the meantime, here are some ideas you can reflect on: I will further develop at least one of these ideas in a future post. Bonus: cross-tool comparisons In my mtree-netbsd packaging, I added tests like this to compare between tools:
fmtree -c -K $(MTREE_KEYWORDS)   mtree
mtree -c -K $(MTREE_KEYWORDS)   sed -e 's/\(md5\ sha1\ sha256\ sha384\ sha512\)=/\1digest=/' -e 's/rmd160=/ripemd160digest=/'   fmtree
bsdtar -cf - --options 'mtree:uname,gname,md5,sha1,sha256,sha384,sha512,device,flags,gid,link,mode,nlink,size,time,uid,type,uname' --format mtree .   mtree

23 December 2020

Jonathan McDowell: Rooting the Tesco Hudl

Tesco Hudl I have an original Tesco Hudl - a Rockchip RK3188 based Android tablet. It s somewhat long in the tooth and mine is running Android 4.2.2 (Jelly Bean). As a first step in trying to get it updated a bit I decided to root it and have a poke about. There are plenty of guides for this, but they mostly involve downloading Android apps that look dodgy or don t exist any more. Thankfully the bootloader is unlocked, so I did it the hard (manual) way from a Debian 10 (Buster) box. I doubt this is useful to many folk, but I thought I d write it up. As you d expect follow this at your own risk; there is the potential to brick the Hudl. First, enable developer mode on the Hudl (so we can adb in). Open the Settings app, scroll down to the bottom and click About Tablet , scroll down to the bottom and tap Build number 7 times, at which point it will tell you You are now a developer! . Go back to the main settings menu and just above About Tablet there will now be a Developer options entry. Click it, then make sure the box beside USB debugging is ticked. Now you need to install the appropriate tools on your Debian box. That should be:
$ sudo apt install adb rkflashtool
We also need to download a suitable su tool. I lazily went for the prebuilt SuperSU Root:
$ mkdir hudl-root
$ cd hudl-root
$ wget https://supersuroot.org/downloads/SuperSU-v2.79-201612051815.zip
$ unzip SuperSU-v2.79-201612051815.zip
2.82 is the latest version but has problems on Jelly Bean; the device will end up not properly booting. Hook the Hudl up to your machine with a suitable USB cable and you ll now be able to get a shell on it:
$ adb shell
* daemon not running; starting now at tcp:5037
* daemon started successfully
shell@android:/ $
Ctrl-D will quit the shell and return you back to the local prompt. Next step is to reboot into the Rockchip bootloader, and use that to download the system partition (just over 1G in size)
$ adb reboot bootloader
$ sudo rkflashtool r system > system.img
rkflashtool: info: rkflashtool v5.2
rkflashtool: info: Detected RK3188...
rkflashtool: info: interface claimed
rkflashtool: info: working with partition: system
rkflashtool: info: found offset: 0x00142000
rkflashtool: info: found size: 0x00200000
rkflashtool: info: reading flash memory at offset 0x00341fe0... Done!
We now have a system.img file which represents the system partition of the device. We can mount that and copy over the su binary and SuperSU apk.
$ sudo mount -o loop system.img /mnt
$ sudo cp common/Superuser.apk /mnt/app/
$ sudo cp armv7/su /mnt/xbin/
$ sudo chmod +sx /mnt/xbin/su
$ sudo umount /mnt
Finally we can write this image back to the device, reboot and once the reboot has completed use adb to connect and su to root. SuperSU might pop up a dialog on the tablet asking you to ok the action (and possibly indicate it needs to do a fixup of the installation):
$ sudo rkflashtool w system < system.img
$ sudo rkflashtool b
$ adb shell
shell@android:/ $ su -
root@android:/ #

15 November 2020

Jamie McClelland: Being your own Certificate Authority

There are many blogs and tutorials with nice shortcuts providing the necessary openssl commands to create and sign x509 certficates. However, there is precious few instructions for how to easily create your own certificate authority. You probably never want to do this in a production environment, but in a development environment it will make your life signficantly easier. Create the certificate authority Create the key and certificate Pick a directory to store things in. Then, make your certificate authority key and certificate:
openssl genrsa -out cakey.pem 2048
openssl req -x509 -new -nodes -key cakey.pem -sha256 -days 1024 -out cacert.pem
Some tips: Want to review what you created?
openssl x509 -text -noout -in cacert.pem 
Prepare your directory You can create your own /etc/ssl/openssl.cnf file and really customize things. But I find it safer to use your distribution's default file so you can benefit from changes to it every time you upgrade. If you do take the default file, you may have the dir option coded to demoCA (in Debian at least, maybe it's the upstream default too). So, to avoid changing any configuration files, let's just use this value. Which means... you'll need to create that directory. The setting is relative - so you can create this directory in the same directory you have your keys.
mkdir demoCA
Lastly, you have to have a file that keeps track of your certificates. If it doesn't exist, you get an error:
touch demoCA/index.txt
That's it! Your certificate authority is ready to go. Create a key and ceritificate signing request First, pick your domain names (aka "common" names). For example, example.org and www.example.org. Set those values in an environment variable. If you just have one:
export subjectAltName=DNS:example.org
If you have more then one:
export subjectAltName=DNS:example.org,DNS:www.example.org
Next, create a key and a certificate signing request:
openssl req -new -nodes -out new.csr -keyout new.key
Again, you will be prompted for some values (country, state, etc) - be sure to choose the same values you used with your certficiate authority! I honestly don't understand why this is necessary (when I set different values I get an error on the signing request step below). Maybe someone can add a comment to this post explaining why these values have to match? Also, you must provide a common name for your certificate - you can choose the same name as the altSubjectNames value you set above (but just one domain). Want to review what you created?
openssl req -in new.csr -text -noout 
Sign it! At last the momenet we have been waiting for.
openssl ca -keyfile cakey.pem -cert cacert.pem -out new.crt -outdir . -rand_serial -infiles new.csr
Now yu have a new.crt and new.csr that you can install via your web browser, mail server, etc specification. Sanity check it This command will confirm that the certificate is trusted by your certificate authority.
openssl verify -no-CApath -CAfile cacert.pem new.crt 
But wait, there's still a question of trust You probably want to tell your computer or browser that you want to trust your certificate signing authority. Command line tools Most tools in linux by default will trust all the certificates in /etc/ssl/certs/ca-certificates.crt. (If that file doesn't exist, try installing the ca-certificates package). If you want to add your certificate to that file:
cp cacert.pem /usr/local/share/ca-certificates/cacert.crt
sudo dpkg-reconfigure ca-certificates
Want to know what's funny? Ok, not really funny. If the certificate name ends with .pem the command above won't work. Seriously. Once your certificate is installed with your web server you can now test to make sure it's all working with:
gnutls-cli --print-cert $domainName
Want a second opinion?
curl https://$domainName
wget https://$domainName -O-
Both will report errors if the certificate can't be verified by a system certificate. If you really want to narrow down the cause of error (maybe reconfiguring ca-certificates didn't work)?
curl --cacert /path/to/your/cacert.pem --capath /tmp
Those arguments tell curl to use your certificate authority file and not to load any other certificate authority files (well, unless you have some installed in the temp directory). Web browsers Firefox and Chrome have their own store of trusted certificates - you'll have to import your cacert.pem file into each browser that you want to trust your key.

9 November 2020

Joachim Breitner: Distributing Haskell programs in a multi-platform zip file

My maybe most impactful piece of code is tttool and the surrounding project, which allows you to create your own content for the Ravensburger Tiptoi platform. The program itself is a command line tool, and in this blog post I want to show how I go about building that program for Linux (both normal and static builds), Windows (cross-compiled from Linux), OSX (only on CI), all combined into and released as a single zip file. Maybe some of it is useful or inspiring to my readers, or can even serve as a template. This being a blob post, though, note that it may become obsolete or outdated.

Ingredients I am building on the these components: Without the nix build system and package manger I probably woudn t even attempt to pull of complex tasks that may, say, require a patched ghc. For many years I resisted learning about nix, but when I eventually had to, I didn t want to go back. This project provides an alternative Haskell build infrastructure for nix. While this is not crucial for tttool, it helps that they tend to have some cross-compilation-related patches more than the official nixpkgs. I also like that it more closely follows the cabal build work-flow, where cabal calculates a build plan based on your projects dependencies. It even has decent documentation (which is a new thing compared to two years ago). Niv is a neat little tool to keep track of your dependencies. You can quickly update them with, say niv update nixpkgs. But what s really great is to temporarily replace one of your dependencies with a local checkout, e.g. via NIV_OVERRIDE_haskellNix=$HOME/build/haskell/haskell.nix nix-instantiate -A osx-exe-bundle There is a Github action that will keep your niv-managed dependencies up-to-date. This service (proprietary, but free to public stuff up to 10GB) gives your project its own nix cache. This means that build artifacts can be cached between CI builds or even build steps, and your contributors. A cache like this is a must if you want to use nix in more interesting ways where you may end up using, say, a changed GHC compiler. Comes with GitHub actions integration.
  • CI via Github actions
Until recently, I was using Travis, but Github actions are just a tad easier to set up and, maybe more important here, the job times are high enough that you can rebuild GHC if you have to, and even if your build gets canceled or times out, cleanup CI steps still happen, so that any new nix build products will still reach your nix cache.

The repository setup All files discussed in the following are reflected at https://github.com/entropia/tip-toi-reveng/tree/7020cde7da103a5c33f1918f3bf59835cbc25b0c. We are starting with a fairly normal Haskell project, with a single .cabal file (but multi-package projects should work just fine). To make things more interesting, I also have a cabal.project which configures one dependency to be fetched via git from a specific fork. To start building the nix infrastructure, we can initialize niv and configure it to use the haskell.nix repo:
niv init
niv add input-output-hk/haskell.nix -n haskellNix
This creates nix/sources.json (which you can also edit by hand) and nix/sources.nix (which you can treat like a black box). Now we can start writing the all-important default.nix file, which defines almost everything of interest here. I will just go through it line by line, and explain what I am doing here.
  checkMaterialization ? false  :
This defines a flag that we can later set when using nix-build, by passing --arg checkMaterialization true, and which is off by default. I ll get to that flag later.
let
  sources = import nix/sources.nix;
  haskellNix = import sources.haskellNix  ;
This imports the sources as defined niv/sources.json, and loads the pinned revision of the haskell.nix repository.
  # windows crossbuilding with ghc-8.10 needs at least 20.09.
  # A peek at https://github.com/input-output-hk/haskell.nix/blob/master/ci.nix can help
  nixpkgsSrc = haskellNix.sources.nixpkgs-2009;
  nixpkgsArgs = haskellNix.nixpkgsArgs;
  pkgs = import nixpkgsSrc nixpkgsArgs;
Now we can define pkgs, which is our version of the nixpkgs package set, extended with the haskell.nix machinery. We rely on haskell.nix to pin of a suitable revision of the nixpkgs set (see how we are using their niv setup). Here we could our own configuration, overlays, etc to nixpkgsArgs. In fact, we do in
  pkgs-osx = import nixpkgsSrc (nixpkgsArgs //   system = "x86_64-darwin";  );
to get the nixpkgs package set of an OSX machine.
  # a nicer filterSource
  sourceByRegex =
    src: regexes: builtins.filterSource (path: type:
      let relPath = pkgs.lib.removePrefix (toString src + "/") (toString path); in
      let match = builtins.match (pkgs.lib.strings.concatStringsSep " " regexes); in
      ( type == "directory"  && match (relPath + "/") != null
        match relPath != null)) src;
Next I define a little helper that I have been copying between projects, and which allows me to define the input to a nix derivation (i.e. a nix build job) with a set of regexes. I ll use that soon.
  tttool-exe = pkgs: sha256:
    (pkgs.haskell-nix.cabalProject  
The cabalProject function takes a cabal project and turns it into a nix project, running cabal v2-configure under the hood to let cabal figure out a suitable build plan. Since we want to have multiple variants of the tttool, this is so far just a function of two arguments pkgs and sha256, which will be explained in a bit.
      src = sourceByRegex ./. [
          "cabal.project"
          "src/"
          "src/.*/"
          "src/.*.hs"
          ".*.cabal"
          "LICENSE"
        ];
The cabalProject function wants to know the source of the Haskell projects. There are different ways of specifying this; in this case I went for a simple whitelist approach. Note that cabal.project.freze (which exists in the directory) is not included.
      # Pinning the input to the constraint solver
      compiler-nix-name = "ghc8102";
The cabal solver doesn t find out which version of ghc to use, that is still my choice. I am using GHC-8.10.2 here. It may require a bit of experimentation to see which version works for your project, especially when cross-compiling to odd targets.
      index-state = "2020-11-08T00:00:00Z";
I want the build to be deterministic, and not let cabal suddenly pick different package versions just because something got uploaded. Therefore I specify which snapshot of the Hackage package index it should consider.
      plan-sha256 = sha256;
      inherit checkMaterialization;
Here we use the second parameter, but I ll defer the explanation for a bit.
      modules = [ 
        # smaller files
        packages.tttool.dontStrip = false;
       ] ++
These modules are essentially configuration data that is merged in a structural way. Here we say that we want the tttool binary to be stripped (saves a few megabyte).
      pkgs.lib.optional pkgs.hostPlatform.isMusl  
        packages.tttool.configureFlags = [ "--ghc-option=-static" ];
Also, when we are building on the musl platform, that s when we want to produce a static build, so let s pass -static to GHC. This seems to be enough in terms of flags to produce static binaries. It helps that my project is using mostly pure Haskell libraries; if you link against C libraries you might have to jump through additional hoops to get static linking going. The haskell.nix documentation has a section on static building with some flags to cargo-cult.
        # terminfo is disabled on musl by haskell.nix, but still the flag
        # is set in the package plan, so override this
        packages.haskeline.flags.terminfo = false;
       ;
This (again only used when the platform is musl) seems to be necessary to workaround what might be a big in haskell.nix.
     ).tttool.components.exes.tttool;
The cabalProject function returns a data structure with all Haskell packages of the project, and for each package the different components (libraries, tests, benchmarks and of course executables). We only care about the tttool executable, so let s project that out.
  osx-bundler = pkgs: tttool:
   pkgs.stdenv.mkDerivation  
      name = "tttool-bundle";
      buildInputs = [ pkgs.macdylibbundler ];
      builder = pkgs.writeScript "tttool-osx-bundler.sh" ''
        source $ pkgs.stdenv /setup
        mkdir -p $out/bin/osx
        cp $ tttool /bin/tttool $out/bin/osx
        chmod u+w $out/bin/osx/tttool
        dylibbundler \
          -b \
          -x $out/bin/osx/tttool \
          -d $out/bin/osx \
          -p '@executable_path' \
          -i /usr/lib/system \
          -i $ pkgs.darwin.Libsystem /lib
      '';
     ;
This function, only to be used on OSX, takes a fully build tttool, finds all the system libraries it is linking against, and copies them next to the executable, using the nice macdylibbundler. This way we can get a self-contained executable. A nix expert will notice that this probably should be written with pkgs.runCommandNoCC, but then dylibbundler fails because it lacks otool. This should work eventually, though.
in rec  
  linux-exe      = tttool-exe pkgs
     "0rnn4q0gx670nzb5zp7xpj7kmgqjmxcj2zjl9jqqz8czzlbgzmkh";
  windows-exe    = tttool-exe pkgs.pkgsCross.mingwW64
     "01js5rp6y29m7aif6bsb0qplkh2az0l15nkrrb6m3rz7jrrbcckh";
  static-exe     = tttool-exe pkgs.pkgsCross.musl64
     "0gbkyg8max4mhzzsm9yihsp8n73zw86m3pwvlw8170c75p3vbadv";
  osx-exe        = tttool-exe pkgs-osx
     "0rnn4q0gx670nzb5zp7xpj7kmgqjmxcj2zjl9jqqz8czzlbgzmkh";
Time to create the four versions of tttool. In each case we use the tttool-exe function from above, passing the package set (pkgs, ) and a SHA256 hash. The package set is either the normal one, or it is one of those configured for cross compilation, building either for Windows or for Linux using musl, or it is the OSX package set that we instantiated earlier. The SHA256 hash describes the result of the cabal plan calculation that happens as part of cabalProject. By noting down the expected result, nix can skip that calculation, or fetch it from the nix cache etc. How do we know what number to put there, and when to change it? That s when the --arg checkMaterialization true flag comes into play: When that is set, cabalProject will not blindly trust these hashes, but rather re-calculate them, and tell you when they need to be updated. We ll make sure that CI checks them.
  osx-exe-bundle = osx-bundler pkgs-osx osx-exe;
For OSX, I then run the output through osx-bundler defined above, to make it independent of any library paths in /nix/store. This is already good enough to build the tool for the various systems! The rest of the the file is related to packaging up the binaries, to tests, and various other things, but nothing too essentially. So if you got bored, you can more or less stop now.
  static-files = sourceByRegex ./. [
    "README.md"
    "Changelog.md"
    "oid-decoder.html"
    "example/.*"
    "Debug.yaml"
    "templates/"
    "templates/.*\.md"
    "templates/.*\.yaml"
    "Audio/"
    "Audio/digits/"
    "Audio/digits/.*\.ogg"
  ];
  contrib = ./contrib;
The final zip file that I want to serve to my users contains a bunch of files from throughout my repository; I collect them here.
  book =  ;
The project comes with documentation in the form of a Sphinx project, which we build here. I ll omit the details, because they are not relevant for this post (but of course you can peek if you are curious).
  os-switch = pkgs.writeScript "tttool-os-switch.sh" ''
    #!/usr/bin/env bash
    case "$OSTYPE" in
      linux*)   exec "$(dirname "''$ BASH_SOURCE[0] ")/linux/tttool" "$@" ;;
      darwin*)  exec "$(dirname "''$ BASH_SOURCE[0] ")/osx/tttool" "$@" ;;
      msys*)    exec "$(dirname "''$ BASH_SOURCE[0] ")/tttool.exe" "$@" ;;
      cygwin*)  exec "$(dirname "''$ BASH_SOURCE[0] ")/tttool.exe" "$@" ;;
      *)        echo "unsupported operating system $OSTYPE" ;;
    esac
  '';
The zipfile should provide a tttool command that works on all systems. To that end, I implement a simple platform switch using bash. I use pks.writeScript so that I can include that file directly in default.nix, but it would have been equally reasonable to just save it into nix/tttool-os-switch.sh and include it from there.
  release = pkgs.runCommandNoCC "tttool-release"  
    buildInputs = [ pkgs.perl ];
    ''
    # check version
    version=$($ static-exe /bin/tttool --help perl -ne 'print $1 if /tttool-(.*) -- The swiss army knife/')
    doc_version=$(perl -ne "print \$1 if /VERSION: '(.*)'/" $ book /book.html/_static/documentation_options.js)
    if [ "$version" != "$doc_version" ]
    then
      echo "Mismatch between tttool version \"$version\" and book version \"$doc_version\""
      exit 1
    fi
Now the derivation that builds the content of the release zip file. First I double check that the version number in the code and in the documentation matches. Note how $ static-exe refers to a path with the built static Linux build, and $ book the output of the book building process.
    mkdir -p $out/
    cp -vsr $ static-files /* $out
    mkdir $out/linux
    cp -vs $ static-exe /bin/tttool $out/linux
    cp -vs $ windows-exe /bin/* $out/
    mkdir $out/osx
    cp -vsr $ osx-exe-bundle /bin/osx/* $out/osx
    cp -vs $ os-switch  $out/tttool
    mkdir $out/contrib
    cp -vsr $ contrib /* $out/contrib/
    cp -vsr $ book /* $out
  '';
The rest of the release script just copies files from various build outputs that we have defined so far. Note that this is using both static-exe (built on Linux) and osx-exe-bundle (built on Mac)! This means you can only build the release if you either have setup a remote osx builder (a pretty nifty feature of nix, which I unfortunately can t use, since I don't have access to a Mac), or the build product must be available in a nix cache (which it is in my case, as I will explain later). The output of this derivation is a directory with all the files I want to put in the release.
  release-zip = pkgs.runCommandNoCC "tttool-release.zip"  
    buildInputs = with pkgs; [ perl zip ];
    ''
    version=$(bash $ release /tttool --help perl -ne 'print $1 if /tttool-(.*) -- The swiss army knife/')
    base="tttool-$version"
    echo "Zipping tttool version $version"
    mkdir -p $out/$base
    cd $out
    cp -r $ release /* $base/
    chmod u+w -R $base
    zip -r $base.zip $base
    rm -rf $base
  '';
And now these files are zipped up. Note that this automatically determines the right directory name and basename for the zipfile. This concludes the step necessary for a release.
  gme-downloads =  ;
  tests =  ;
These two definitions in default.nix are related to some simple testing, and again not relevant for this post.
  cabal-freeze = pkgs.stdenv.mkDerivation  
    name = "cabal-freeze";
    src = linux-exe.src;
    buildInputs = [ pkgs.cabal-install linux-exe.env ];
    buildPhase = ''
      mkdir .cabal
      touch .cabal/config
      rm cabal.project # so that cabal new-freeze does not try to use HPDF via git
      HOME=$PWD cabal new-freeze --offline --enable-tests   true
    '';
    installPhase = ''
      mkdir -p $out
      echo "-- Run nix-shell -A check-cabal-freeze to update this file" > $out/cabal.project.freeze
      cat cabal.project.freeze >> $out/cabal.project.freeze
    '';
   ;
Above I mentioned that I still would like to be able to just run cabal, and ideally it should take the same library versions that the nix-based build does. But pinning the version of ghc in cabal.project is not sufficient, I also need to pin the precise versions of the dependencies. This is best done with a cabal.project.freeze file. The above derivation runs cabal new-freeze in the environment set up by haskell.nix and grabs the resulting cabal.project.freeze. With this I can run nix-build -A cabal-freeze and fetch the file from result/cabal.project.freeze and add it to the repository.
  check-cabal-freeze = pkgs.runCommandNoCC "check-cabal-freeze"  
      nativeBuildInputs = [ pkgs.diffutils ];
      expected = cabal-freeze + /cabal.project.freeze;
      actual = ./cabal.project.freeze;
      cmd = "nix-shell -A check-cabal-freeze";
      shellHook = ''
        dest=$ toString ./cabal.project.freeze 
        rm -f $dest
        cp -v $expected $dest
        chmod u-w $dest
        exit 0
      '';
      ''
      diff -r -U 3 $actual $expected  
          echo "To update, please run"; echo "nix-shell -A check-cabal-freeze"; exit 1;  
      touch $out
    '';
But generated files in repositories are bad, so if that cannot be avoided, at least I want a CI job that checks if they are up to date. This job does that. What s more, it is set up so that if I run nix-shell -A check-cabal-freeze it will update the file in the repository automatically, which is much more convenient than manually copying. Lately, I have been using this pattern regularly when adding generated files to a repository: * Create one nix derivation that creates the files * Create a second derivation that compares the output of that derivation against the file in the repo * Create a derivation that, when run in nix-shell, updates that file. Sometimes that derivation is its own file (so that I can just run nix-shell nix/generate.nix), or it is merged into one of the other two. This concludes the tour of default.nix.

The CI setup The next interesting bit is the file .github/workflows/build.yml, which tells Github Actions what to do:
name: "Build and package"
on:
  pull_request:
  push:
Standard prelude: Run the jobs in this file upon all pushes to the repository, and also on all pull requests. Annoying downside: If you open a PR within your repository, everything gets built twice. Oh well.
jobs:
  build:
    strategy:
      fail-fast: false
      matrix:
        include:
        - target: linux-exe
          os: ubuntu-latest
        - target: windows-exe
          os: ubuntu-latest
        - target: static-exe
          os: ubuntu-latest
        - target: osx-exe-bundle
          os: macos-latest
    runs-on: $  matrix.os  
The build job is a matrix job, i.e. there are four variants, one for each of the different tttool builds, together with an indication of what kind of machine to run this on.
    - uses: actions/checkout@v2
    - uses: cachix/install-nix-action@v12
We begin by checking out the code and installing nix via the install-nix-action.
    - name: "Cachix: tttool"
      uses: cachix/cachix-action@v7
      with:
        name: tttool
        signingKey: '$  secrets.CACHIX_SIGNING_KEY  '
Then we configure our Cachix cache. This means that this job will use build products from the cache if possible, and it will also push new builds to the cache. This requires a secret key, which you get when setting up your Cachix cache. See the nix and Cachix tutorial for good instructions.
    - run: nix-build --arg checkMaterialization true -A $  matrix.target  
Now we can actually run the build. We set checkMaterialization to true so that CI will tell us if we need to update these hashes.
    # work around https://github.com/actions/upload-artifact/issues/92
    - run: cp -RvL result upload
    - uses: actions/upload-artifact@v2
      with:
        name: tttool ($  matrix.target  )
        path: upload/
For convenient access to build products, e.g. from pull requests, we store them as Github artifacts. They can then be downloaded from Github s CI status page.
  test:
    runs-on: ubuntu-latest
    needs: build
    steps:
    - uses: actions/checkout@v2
    - uses: cachix/install-nix-action@v12
    - name: "Cachix: tttool"
      uses: cachix/cachix-action@v7
      with:
        name: tttool
        signingKey: '$  secrets.CACHIX_SIGNING_KEY  '
    - run: nix-build -A tests
The next job repeats the setup, but now runs the tests. Because of needs: build it will not start before the builds job has completed. This also means that it should get the actual tttool executable to test from our nix cache.
  check-cabal-freeze:
    runs-on: ubuntu-latest
    steps:
    - uses: actions/checkout@v2
    - uses: cachix/install-nix-action@v12
    - name: "Cachix: tttool"
      uses: cachix/cachix-action@v7
      with:
        name: tttool
        signingKey: '$  secrets.CACHIX_SIGNING_KEY  '
    - run: nix-build -A check-cabal-freeze
The same, but now running the check-cabal-freeze test mentioned above. Quite annoying to repeat the setup instructions for each job
  package:
    runs-on: ubuntu-latest
    needs: build
    steps:
    - uses: actions/checkout@v2
    - uses: cachix/install-nix-action@v12
    - name: "Cachix: tttool"
      uses: cachix/cachix-action@v7
      with:
        name: tttool
        signingKey: '$  secrets.CACHIX_SIGNING_KEY  '
    - run: nix-build -A release-zip
    - run: unzip -d upload ./result/*.zip
    - uses: actions/upload-artifact@v2
      with:
        name: Release zip file
        path: upload
Finally, with the same setup, but slightly different artifact upload, we build the release zip file. Again, we wait for build to finish so that the built programs are in the nix cache. This is especially important since this runs on linux, so it cannot build the OSX binary and has to rely on the cache. Note that we don t need to checkMaterialization again. Annoyingly, the upload-artifact action insists on zipping the files you hand to it. A zip file that contains just a zipfile is kinda annoying, so I unpack the zipfile here before uploading the contents.

Conclusion With this setup, when I do a release of tttool, I just bump the version numbers, wait for CI to finish building, run nix-build -A release-zip and upload result/tttool-n.m.zip. A single file that works on all target platforms. I have not yet automated making the actual release, but with one release per year this is fine. Also, when trying out a new feature, I can easily create a branch or PR for that and grab the build products from Github s CI, or ask people to try them out (e.g. to see if they fixed their bugs). Note, though, that you have to sign into Github before being able to download these artifacts. One might think that this is a fairly hairy setup finding the right combinations of various repertories so that cross-compilation works as intended. But thanks to nix s value propositions, this does work! The setup presented here was a remake of a setup I did two years ago, with a much less mature haskell.nix. Back then, I committed a fair number of generated files to git, and juggled more complex files but once it worked, it kept working for two years. I was indeed insulated from upstream changes. I expect that this setup will also continue to work reliably, until I choose to upgrade it again. Hopefully, then things are even more simple, and require less work-around or manual intervention.

1 November 2020

Vincent Bernat: Running Isso on NixOS in a Docker container

This short article documents how I run Isso, the commenting system used by this blog, inside a Docker container on NixOS, a Linux distribution built on top of Nix. Nix is a declarative package manager for Linux and other Unix systems.
While NixOS 20.09 includes a derivation for Isso, it is unfortunately broken and relies on Python 2. As I am also using a fork of Isso, I have built my own derivation, heavily inspired by the one in master:1
issoPackage = with pkgs.python3Packages; buildPythonPackage rec  
  pname = "isso";
  version = "custom";
  src = pkgs.fetchFromGitHub  
    # Use my fork
    owner = "vincentbernat";
    repo = pname;
    rev = "vbe/master";
    sha256 = "0vkkvjcvcjcdzdj73qig32hqgjly8n3ln2djzmhshc04i6g9z07j";
   ;
  propagatedBuildInputs = [
    itsdangerous
    jinja2
    misaka
    html5lib
    werkzeug
    bleach
    flask-caching
  ];
  buildInputs = [
    cffi
  ];
  checkInputs = [ nose ];
  checkPhase = ''
    $ python.interpreter  setup.py nosetests
  '';
 ;
I want to run Isso through Gunicorn. To this effect, I build a Python environment combining Isso and Gunicorn. Then, I can invoke the latter with "$ issoEnv /bin/gunicorn", like with a virtual environment.
issoEnv = pkgs.python3.buildEnv.override  
    extraLibs = [
      issoPackage
      pkgs.python3Packages.gunicorn
      pkgs.python3Packages.gevent
    ];
 ;
Before building a Docker image, I also need to specify the Isso configuration file for Isso:
issoConfig = pkgs.writeText "isso.conf" ''
  [general]
  dbpath = /db/comments.db
  host =
    https://vincent.bernat.ch
    http://localhost:8080
  notify = smtp
  [ ]
'';
NixOS comes with a convenient tool to build a Docker image without a Dockerfile:
issoDockerImage = pkgs.dockerTools.buildImage  
  name = "isso";
  tag = "latest";
  extraCommands = ''
    mkdir -p db
  '';
  config =  
    Cmd = [ "$ issoEnv /bin/gunicorn"
            "--name" "isso"
            "--bind" "0.0.0.0:$ port "
            "--worker-class" "gevent"
            "--workers" "2"
            "--worker-tmp-dir" "/dev/shm"
            "--preload"
            "isso.run"
          ];
    Env = [
      "ISSO_SETTINGS=$ issoConfig "
      "SSL_CERT_FILE=$ pkgs.cacert /etc/ssl/certs/ca-bundle.crt"
    ];
   ;
 ;
Because we refer to the issoEnv derivation in config.Cmd, the whole derivation, including Isso and Gunicorn, is copied inside the Docker image. The same applies for issoConfig, the configuration file we created earlier, and pkgs.cacert, the derivation containing trusted root certificates. The resulting image is 171 MB once installed, which is comparable to the Debian Buster image generated by the official Dockerfile. NixOS features an abstraction to run Docker containers. It is not currently documented in NixOS manual but you can look at the source code of the module for the available options. I choose to use Podman instead of Docker as the backend because it does not require running an additional daemon.
virtualisation.oci-containers =  
  backend = "podman";
  containers =  
    isso =  
      image = "isso";
      imageFile = issoDockerImage;
      ports = ["127.0.0.1:$ port :$ port "];
      volumes = [
        "/var/db/isso:/db"
      ];
     ;
   ;
 ;
A systemd unit file is automatically created to run and supervise the container:
$ systemctl status podman-isso.service
  podman-isso.service
     Loaded: loaded (/nix/store/a66gzqqwcdzbh99sz8zz5l5xl8r8ag7w-unit->
     Active: active (running) since Sun 2020-11-01 16:04:16 UTC; 4min 44s ago
    Process: 14564 ExecStartPre=/nix/store/95zfn4vg4867gzxz1gw7nxayqcl>
   Main PID: 14697 (podman)
         IP: 0B in, 0B out
      Tasks: 10 (limit: 2313)
     Memory: 221.3M
        CPU: 10.058s
     CGroup: /system.slice/podman-isso.service
              14697 /nix/store/pn52xgn1wb2vr2kirq3xj8ij0rys35mf-podma>
              14802 /nix/store/7vsba54k6ag4cfsfp95rvjzqf6rab865-conmo>
nov. 01 16:04:17 web03 podman[14697]: container init (image=localhost/isso:latest)
nov. 01 16:04:17 web03 podman[14697]: container start (image=localhost/isso:latest)
nov. 01 16:04:17 web03 podman[14697]: container attach (image=localhost/isso:latest)
nov. 01 16:04:19 web03 conmon[14802]: INFO: connected to SMTP server
nov. 01 16:04:19 web03 conmon[14802]: INFO: connected to https://vincent.bernat.ch
nov. 01 16:04:19 web03 conmon[14802]: [INFO] Starting gunicorn 20.0.4
nov. 01 16:04:19 web03 conmon[14802]: [INFO] Listening at: http://0.0.0.0:8080 (1)
nov. 01 16:04:19 web03 conmon[14802]: [INFO] Using worker: gevent
nov. 01 16:04:19 web03 conmon[14802]: [INFO] Booting worker with pid: 8
nov. 01 16:04:19 web03 conmon[14802]: [INFO] Booting worker with pid: 9
As the last step, we configure Nginx to forward requests for comments.luffy.cx to the container. NixOS provides a simple integration to grab a Let s Encrypt certificate.
services.nginx.virtualHosts."comments.luffy.cx" =  
  root = "/data/webserver/comments.luffy.cx";
  enableACME = true;
  forceSSL = true;
  extraConfig = ''
    access_log /var/log/nginx/comments.luffy.cx.log anonymous;
  '';
  locations."/" =  
    proxyPass = "http://127.0.0.1:$ port ";
    extraConfig = ''
      proxy_set_header X-Forwarded-For $proxy_add_x_forwarded_for;
      proxy_set_header Host $host;
      proxy_set_header X-Forwarded-Proto $scheme;
      proxy_hide_header Set-Cookie;
      proxy_hide_header X-Set-Cookie;
      proxy_ignore_headers Set-Cookie;
    '';
   ;
 ;
security.acme.certs."comments.luffy.cx" =  
  email = lib.concatStringsSep "@" [ "letsencrypt" "vincent.bernat.ch" ];
 ;

While I still struggle with Nix and NixOS, I am convinced this is how declarative infrastructure should be done. I like how in one single file, I can define the derivation to build Isso, the configuration, the Docker image, the container definition, and the Nginx configuration. The Nix language is used both for building packages and for managing configurations. Moreover, the Docker image is updated automatically like a regular NixOS host. This solves an issue plaguing the Docker ecosystem: no more stale images! My next step would be to combine this approach with Nomad, a simple orchestrator to deploy and manage containers.

  1. There is a subtle difference: I am using buildPythonPackage instead of buildPythonApplication. This is important for the next step. I didn t investigate if an application can be converted to a package easily.

17 October 2020

Dirk Eddelbuettel: digest 0.6.26: Blake3 and Tuning

And a new version of digest is now on CRAN will go to Debian shortly. digest creates hash digests of arbitrary R objects (using the md5, sha-1, sha-256, sha-512, crc32, xxhash32, xxhash64, murmur32, spookyhash, and blake3 algorithms) permitting easy comparison of R language objects. It is a fairly widely-used package (currently listed at 896k monthly downloads, 279 direct reverse dependencies and 8057 indirect reverse dependencies, or just under half of CRAN) as many tasks may involve caching of objects for which it provides convenient general-purpose hash key generation. This release brings two nice contributed updates. Dirk Schumacher added support for blake3 (though we could probably push this a little harder for performance, help welcome). Winston Chang benchmarked and tuned some of the key base R parts of the package. Last but not least I flipped the vignette to the lovely minidown, updated the Travis CI setup using bspm (as previously blogged about in r4 #30), and added a package website using Matertial for MkDocs. My CRANberries provides the usual summary of changes to the previous version. For questions or comments use the issue tracker off the GitHub repo. If you like this or other open-source work I do, you can now sponsor me at GitHub. For the first year, GitHub will match your contributions.

This post by Dirk Eddelbuettel originated on his Thinking inside the box blog. Please report excessive re-aggregation in third-party for-profit settings.

8 October 2020

Dirk Eddelbuettel: littler 0.3.12: Exciting updates

max-heap image The thirteenth release of littler as a CRAN package became available today (after a three day rest at CRAN for no real reason), following in the fourteen-ish year history as a package started by Jeff in 2006, and joined by me a few weeks later. littler is the first command-line interface for R as it predates Rscript. It allows for piping as well for shebang scripting via #!, uses command-line arguments more consistently and still starts faster. It also always loaded the methods package which Rscript only started to do in recent years. littler lives on Linux and Unix, has its difficulties on macOS due to yet-another-braindeadedness there (who ever thought case-insensitive filesystems as a default where a good idea?) and simply does not exist on Windows (yet the build system could be extended see RInside for an existence proof, and volunteers are welcome!). See the FAQ vignette on how to add it to your PATH. A few examples are highlighted at the Github repo, as well as in the examples vignette. This release brings five new example scripts and command wrappers: A number of commands were also extended or updated (see below for more). We have a new and very slick documentation website once again utilising Material for MkDocs. Last but not least the two included vignettes now use minidown and the fabulous water css theme which reduced the file sizes of the two vignettes from, respectively, 884kb and 873kb to 47kb and 15kb. Yes, that is correct. That alone brought the package file size down from 641kb to 116kb. Incredible. The NEWS file entry is below.

Changes in littler version 0.3.12 (2020-10-04)
  • Changes in examples
    • Updates to scripts tt.r, cos.r, cow.r, c4r.r, com.r
    • New script installDeps.r to install dependencies
    • Several updates tp script check.r
    • New script installBSPM.r and installRSPM.r for binary package installation (Dirk and I aki in #81)
    • New script cranIncoming.r to check in Incoming
    • New script urlUpdate.r validates URLs as R does
  • Changes in package
    • Travis CI now uses BSPM
    • A package documentation website was added
    • Vignettes now use minidown resulting in much reduced filesizes: from over 800kb to under 50kb (Dirk in #83)

My CRANberries provides a comparison to the previous release. Full details for the littler release are provided as usual at the ChangeLog page, and now also on the new package docs website. The code is available via the GitHub repo, from tarballs and now of course also from its CRAN page and via install.packages("littler"). Binary packages are available directly in Debian as well as soon via Ubuntu binaries at CRAN thanks to the tireless Michael Rutter. Comments and suggestions are welcome at the GitHub repo. If you like this or other open-source work I do, you can now sponsor me at GitHub. For the first year, GitHub will match your contributions.

This post by Dirk Eddelbuettel originated on his Thinking inside the box blog. Please report excessive re-aggregation in third-party for-profit settings.

Next.

Previous.